Oishii Onigiri: Master the Art of Japanese Rice Balls
Oishii Onigiri are traditional Japanese rice balls, easily portable and endlessly customizable snacks, that has become a global favorite and this article, provides a comprehensive guide on how to master the art of making flavorful, creative onigiri at home, using both traditional and innovative fillings.
Embark on a culinary adventure and discover the secrets to crafting the perfect Oishii Onigiri: Mastering the Art of Japanese Rice Balls with Creative Fillings. From mastering the basics of rice preparation to exploring a world of fillings, this guide equips you with the knowledge to create these delightful Japanese snacks at home.
What Exactly Is Onigiri?
Onigiri, often referred to as Japanese rice balls, is a staple in Japanese cuisine. But what makes it so special?
Let’s explore its essence.
A Humble Beginning
Originating centuries ago as a way to preserve and transport rice, onigiri has evolved far beyond its utilitarian roots. Today, it’s a beloved comfort food enjoyed by people of all ages in Japan and around the world.
It serves as a quick breakfast, a convenient lunch, or a satisfying snack.
More Than Just Rice
At its core, onigiri consists of cooked rice formed into a triangular or cylindrical shape, often wrapped with nori (seaweed). However, the true magic lies in the fillings. From savory salmon and tangy pickled plums to spicy tuna and crunchy tempura, the possibilities are endless.
- Versatility: Onigiri can be filled with almost anything, making it a great way to use leftovers or get creative with your favorite ingredients.
- Portability: Its compact shape makes it easy to carry for picnics, hikes, or school lunches.
- Nutritional Value: Packed with carbohydrates and protein (depending on the filling), onigiri provides a balanced and energy-boosting meal.
- Cultural Significance: Onigiri are deeply rooted in Japanese culture, often associated with warmth, care, and home-cooked meals.
Whether you’re a seasoned cook or a beginner in the kitchen, making onigiri is a fun and rewarding experience. It’s a chance to connect with Japanese culinary traditions and create something delicious and satisfying.
In essence, onigiri is more than just a snack; it’s a cultural icon that embodies simplicity, versatility, and the joy of good food.
Mastering the Rice: The Foundation of Great Onigiri
Perfecting the rice is crucial for achieving exceptional onigiri. Let’s delve into the details.
Here’s how to get it just right.
Choosing the Right Rice
The type of rice you use can significantly impact the texture and flavor of your onigiri. Short-grain Japanese rice, also known as sushi rice or uruchimai, is the preferred choice. This type of rice is sticky, allowing it to hold its shape well when formed into onigiri.
Long-grain rice, on the other hand, is less sticky and may result in onigiri that fall apart easily.
Cooking the Rice to Perfection
The ideal rice-to-water ratio is typically 1:1. Follow these steps:
- Rinse the rice thoroughly under cold water until the water runs clear. This removes excess starch and prevents the rice from becoming too gummy.
- Combine the rinsed rice and water in a pot or rice cooker.
- If using a pot, bring the water to a boil, then reduce the heat to low, cover, and simmer for 15-20 minutes, or until all the water is absorbed. With a rice cooker, simply press the start button.
- Once cooked, let the rice steam, covered, for another 10 minutes to allow the moisture to distribute evenly.
- Gently fluff the rice with a rice paddle or fork to separate the grains.
Seasoning the Rice (Optional)
While plain cooked rice works perfectly well for onigiri, adding a touch of seasoning can enhance the flavor. A common seasoning is a mixture of rice vinegar, sugar, and salt, similar to what’s used for sushi rice. However, you can also experiment with other flavors like sesame oil, soy sauce, or furikake (a Japanese rice seasoning mix).
For seasoned rice:
- Gently mix the seasoning into the cooked rice, being careful not to mash the grains.
- Taste and adjust the seasoning to your liking.
Mastering the rice is the key to making onigiri that are both delicious and visually appealing. By choosing the right type of rice, cooking it properly, and seasoning it to your taste, you’ll be well on your way to creating onigiri that are sure to impress.
Traditional Onigiri Fillings: A Taste of Japan
Japanese cuisine offers plenty of traditional fillings. Let’s delve into some of the most popular.
Here are some classics worth trying.
Umeboshi (Pickled Plum)
Umeboshi, or pickled plum, is a quintessential onigiri filling. Its intensely sour and salty flavor adds a unique tang to the rice. Umeboshi is also known for its health benefits, believed to aid digestion and boost the immune system.
To use umeboshi:
- Remove the pit from the umeboshi plum.
- Chop the plum into small pieces.
- Mix the chopped umeboshi with a small amount of rice for even distribution.
Salmon Flakes
Salmon flakes are a savory and nutritious filling that complements the rice perfectly. They are rich in omega-3 fatty acids and protein, making them a healthy choice for a quick meal.
To prepare salmon flakes:
- Grill, bake, or pan-fry a salmon fillet until cooked through.
- Remove the skin and bones, and flake the salmon with a fork.
- Mix the salmon flakes with a touch of soy sauce or salt to taste.
Tuna Mayo
Tuna mayo is a popular and creamy filling that appeals to both adults and children. It’s a simple mixture of canned tuna, mayonnaise, and a pinch of salt and pepper.
For tuna mayo:
- Drain the canned tuna thoroughly.
- Mix the tuna with mayonnaise, salt, and pepper to taste.
- Add a squeeze of lemon juice for extra flavor.
Kombu (Kelp)
Kombu, or kelp, is a type of seaweed that adds a subtle umami flavor to onigiri. It is often simmered in soy sauce and sugar to create a sweet and savory filling.
To prepare kombu:
- Soak dried kombu in water until softened.
- Cut the kombu into small pieces.
- Simmer the kombu in a mixture of soy sauce, sugar, and water until tender.
These traditional fillings offer a glimpse into the rich flavors of Japan. Experiment with different combinations and find your favorites.
Each delivers a unique and authentic taste.
Creative & Modern Onigiri Fillings: Think Outside the Box
While traditional fillings are undeniably delicious, get creative. Let’s explore some modern and innovative fillings.
Here are some ideas to spark your creativity.
Kimchi and Cheese
For a spicy and savory kick, try filling your onigiri with kimchi and cheese. The fermented kimchi adds a tangy and spicy flavor, while the cheese provides a creamy and comforting element. Use your favorite type of cheese, such as cheddar, mozzarella, or provolone.
Preparing the kimchi and cheese filling is simple:
- Chop the kimchi into small pieces.
- Grate or dice the cheese.
- Mix the kimchi and cheese together.
Avocado and Shrimp
Avocado and shrimp is a refreshing and healthy filling that’s perfect for a light meal. The creamy avocado complements the sweet and succulent shrimp, creating a delightful combination of flavors and textures.
To make this filling:
- Cook the shrimp until pink and cooked through.
- Dice the avocado into small pieces.
- Mix the cooked shrimp and avocado with a touch of mayonnaise or lime juice.
Spicy Chicken
Spicy chicken is a flavorful and satisfying filling that’s sure to please. Marinate chicken pieces in a mixture of soy sauce, ginger, garlic, and chili paste, then grill, bake, or pan-fry until cooked through. Shred the chicken and mix it with a touch of mayonnaise for added creaminess.
How to do it:
- Marinate and cook the chicken.
- Shred the cooked chicken.
- Mix with mayonnaise or your favorite sauce.
Vegetarian Medley
For a vegetarian option, create a medley of roasted vegetables. Roast your favorite vegetables, such as bell peppers, zucchini, eggplant, and mushrooms, with olive oil and herbs. Dice the roasted vegetables and mix them together for a colorful and flavorful filling.
Vegetarian Filling:
- Roast various vegetables with olive oil and herbs.
- Dice the roasted vegetables.
- Mix them together to create a medley.
These modern fillings offer new flavor combinations. Don’t be afraid to experiment and create your own signature fillings.
The options are only limited by your imagination!
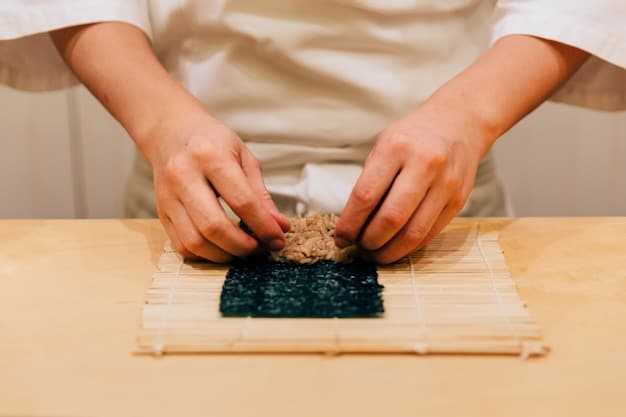
Shaping Techniques: From Simple to Stylish
Shaping onigiri is an art in itself. Let’s explore different techniques that help you create appealing and functional rice balls.
Here’s how to mold perfect onigiri.
The Traditional Triangle
The triangular shape is the most iconic and recognizable form of onigiri. It’s easy to create by hand or with the help of a mold.
To make a triangle:
- Wet your hands with water to prevent the rice from sticking.
- Place a portion of rice in the palm of your hand.
- Create a well in the center and add your desired filling.
- Cover the filling with more rice.
- Gently shape the rice into a triangular shape, pressing firmly but not too hard.
The Cylindrical Shape
The cylindrical shape is another popular option for onigiri. It’s perfect for fillings that are long and thin, such as cucumber or pickled radish.
To form a cylinder:
- Wet your hands and place a portion of rice in your palm.
- Add the filling in the center.
- Shape the rice into a cylindrical shape, pressing gently but firmly.
Using Molds
Onigiri molds are a convenient tool for creating uniform shapes and sizes. They come in various shapes, including triangles, circles, and even animal shapes.
How to use:
- Wet the mold with water.
- Fill the mold with rice, pressing gently.
- Add the filling in the center.
- Cover the filling with more rice.
- Press the lid onto the mold to compress the rice.
- Remove the onigiri from the mold.
Creative Shapes
For a more whimsical touch, try creating fun and creative shapes using cookie cutters or by hand. Animal shapes, stars, and hearts are all great options for kids and adults alike.
Whether you prefer the traditional triangle or a more elaborate shape, mastering the art of shaping onigiri is a satisfying skill. With practice, you’ll be able to create onigiri that are not only delicious but also visually appealing.
Get creative with your shapes and designs!
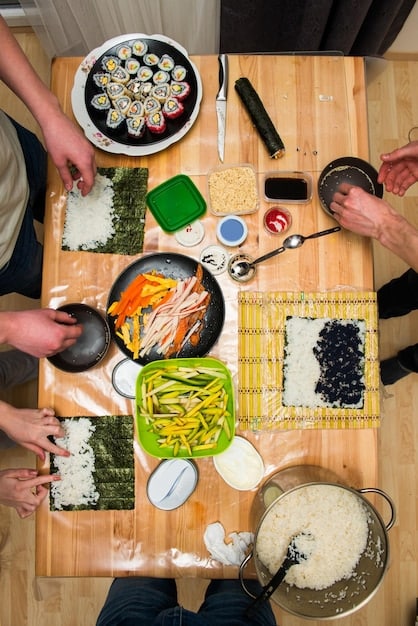
Wrapping and Presentation: The Finishing Touch
The way you wrap and present your onigiri can elevate the experience. Let’s explore the best methods for both.
Here’s how to make your onigiri look and taste great.
Nori (Seaweed)
Nori, or seaweed, is the most traditional wrapping for onigiri. It adds a subtle salty flavor and helps to keep the rice moist.
To wrap with nori:
- Cut the nori into strips.
- Wrap the nori around the onigiri, leaving a small portion of the rice exposed.
- Secure the nori with a small piece of cooked spaghetti or a dab of water.
Plastic Wrap
Plastic wrap is a convenient option for wrapping onigiri, especially when packing them for lunch or travel. It helps to keep the rice moist and prevents it from drying out.
To use plastic wrap:
- Place the onigiri in the center of a sheet of plastic wrap.
- Wrap the plastic wrap tightly around the onigiri, twisting the ends to seal.
- Cut off any excess plastic wrap.
Decorative Touches
Add decorative touches to your onigiri to make them even more appealing. Use edible markers to draw faces or patterns on the nori, or sprinkle sesame seeds or furikake over the rice.
Here are some decorative ideas:
- Use edible markers.
- Sprinkle sesame seeds.
- Add a garnish of fresh herbs.
Presentation Tips
When serving onigiri, presentation matters. Arrange them artfully on a plate or in a bento box. Serve with a side of soy sauce or miso soup for a complete meal.
Presentation is everything:
- Arrange artfully on a plate.
- Serve with soy sauce or miso soup.
- Use a bento box for portability.
Presentation can make your onigiri even more enjoyable. Experiment with different wrappings, decorations, and serving styles to create a memorable experience.
A well-presented snack appeals to all the senses.
| Key Point | Brief Description |
|---|---|
| 🍚 Rice Selection | Use short-grain Japanese rice for best results. |
| 🍙 Filling Ideas | Experiment with traditional and modern fillings. |
| ✨ Shaping Tips | Wet hands or use molds for shaping. |
| 🌿 Wrapping Style | Use nori or plastic wrap to keep rice moist. |
Frequently Asked Questions
▼
Short-grain Japanese rice, also known as sushi rice, is the best choice because its stickiness helps the onigiri hold its shape. Avoid long-grain rice, which is less sticky.
▼
Wet your hands with water before shaping the rice. You can also lightly salt your hands to add a bit of flavor and further prevent sticking.
▼
Popular fillings include umeboshi (pickled plum), salmon flakes, tuna mayo, kombu (kelp), kimchi and cheese, avocado and shrimp, spicy chicken, and roasted vegetables.
▼
Onigiri are best consumed within a few hours of making them. If you need to store them, wrap them tightly in plastic wrap and refrigerate for up to 24 hours. Reheat gently before eating.
▼
Yes, you can freeze onigiri. Wrap them individually in plastic wrap and place them in a freezer-safe bag. They can be stored in the freezer for up to a month. Thaw completely before eating.
Conclusion
Mastering Oishii Onigiri: Mastering the Art of Japanese Rice Balls with Creative Fillings is a rewarding culinary journey that brings the authentic flavors of Japan to your kitchen and with its versatility, portability, and endless filling options, onigiri offers a delightful and practical meal solution for any occasion. Embrace the tradition, explore creative twists, and enjoy the art of making these delicious Japanese rice balls.


